Friday, November 23, 2012

Vegetable Tian


Vegetable Tian

Original Recipe: http://www.fortheloveofcooking.net/2009/02/vegetable-tian.html

Ingredients:
  • 2 tbsp olive oil (divided)
  • 1 large sweet yellow onion cut in half and sliced
  • 2 cloves of garlic, minced
  • 1-2 russet potatoes, unpeeled
  • 1 zucchini
  • 1 yellow squash
  • 3 large Roma tomatoes
  • Sea salt, freshly cracked black pepper, to taste
  • Dried thyme, to taste
  • 1/2 cup of grated Parmesan cheese


Directions:
  1. Preheat the oven to 375 degrees. Coat a baking dish with olive oil cooking spray. Heat 1 tbsp of olive oil in a large skillet over medium heat. Once hot, add the onions and saute until translucent, about 8 minutes. Add the garlic and cook for another 60 seconds. Spread the onion mixture on the bottom of the greased baking dish.
  2. Slice the potatoes, zucchini, squash and tomatoes in 1/4 inch thick slices. Layer them alternately in the dish on top of the onions, fitting them tightly into a spiral, making only one layer. Season with sea salt, black pepper and dried thyme, to taste. Drizzle the last tablespoon of olive oil over the top.
  3. Cover the dish with tin foil and bake for 35 minutes, or until the potatoes are tender. Uncover and sprinkle the Parmesan cheese on top and bake for another 25-30 minutes or until browned. Enjoy.

Peppermint Oreo Truffles Recipe


Peppermint Oreo Truffles Recipe

Original Recipe: http://sweetannas.com/2011/11/peppermint-oreo-truffles.html

Ingredients:
  • 1 (16.6oz) package regular Oreo cookies (not double-stuffed)
  • 6 regular-sized candy canes, unwrapped and finely crushed
  • 1 (8oz) package cream cheese, room temperature
  • 2 cups chocolate chips
  • 1 tablespoon vegetable oil


Directions:
  1. Place all the Oreo cookies in the bowl of your food processor and pulse until they are finely ground.
  2. Set aside a few tablespoons of the crushed candy canes and then dump the rest and the block of cream cheese into the food processor.  Continue to pulse until the mixture is well combined and smooth. (You can do this in a mixer or by hand, of course…  I just find that the food processor makes the quickest work of it!  If you’re not using a food processor, crush up the Oreos in a ziploc bag before mixing!)
  3. Place the mixture into the fridge to firm up a little for about 30 minutes to an hour.
  4. Line a cookie sheet with parchment or waxed paper.  Take the truffle mixture out of the fridge and scoop and roll equal sized balls, placing them onto the tray as you go.
  5. Once your tray is full, place the truffles in the freezer to chill for at least an hour or up to a day.
  6. When you’re ready to coat, carefully melt the chocolate chips and vegetable oil in the microwave, stirring well every 30 seconds, until smooth.
  7. Drop each truffle into the melted chocolate and coat evenly with a fork, gently tapping off the excess chocolate.  Place the now-dipped chocolate truffle back on the tray and immediately sprinkle with a pinch of crushed candy canes.  Repeat until all the truffles are dipped & sprinkled!
  8. Store the truffles in the fridge, in an airtight container.  The peppermint flavor comes out even more after several hours of being in the fridge!

Simple Tiramisu


Simple Tiramisu

Original Recipe: http://www.gastronomersguide.com/2008/06/simple-tiramisu.html

Ingredients:
  • 4 large eggs, separated
  • 1 cup plus 1 tablespoon sugar
  • 16 ounces mascarpone cheese
  • 1-1/2 cups brewed coffee
  • 1/2 cup coffee liqueur
  • 40 store-bought ladyfingers
  • 1 cup heavy cream
  • cocoa powder
  • bittersweet chocolate


Directions:
  1. In a large bowl, beat egg yolks and cup of sugar until light and fluffy. Stir in mascarpone until incorporated.
  2. In a stand mixer fitted with the whisk attachment, beat egg whites until soft peaks form. Fold in beaten egg whites into mascarpone mixture.
  3. In a small bowl combine coffee and coffee liqueur. Dip ladyfingers into coffee-liqueur mixture and lay in rows in the bottom of a 9-by-13-inch dish. Spread half of the mascarpone cream on top. Make one more layer of ladyfingers and the remaining mascarpone cream.
  4. In a stand mixer fitted with the whisk attachment, beat heavy cream and tablespoon of sugar until stiff peaks form. Spread whipped cream on top.
  5. Dust with cocoa powder and garnish with grated and/or shaved bittersweet chocolate. Refrigerate for at least 2 hours, preferably overnight. Yield: 10 to 12 slices.

Oven Baked Garlic Fries with Garlic Aioli


Oven Baked Garlic Fries with Garlic Aioli

Original Recipe: http://pixelatedcrumb.com/2011/05/31/oven-baked-garlic-fries-with-garlic-aioli/

Ingredients:
  • 3 potatoes (russet or yukon gold), washed and dried
  • 5 tablespoons vegetable oil or peanut oil (optional: swap 1 tablespoon oil for 1 tablespoon rendered duck fat)
  • 3 cloves garlic, minced

    Seasoning:
  • 3/4 teaspoon salt
  • 1/4 teaspoon ground black pepper
  • 1/2 tablespoon dried rosemary
  • 1/2 tablespoon dried thyme
  • 1/2 tablespoon dried oregano
  • 1 teaspoon smoked paprika
  • 1/2 teaspoon mustard powder
  • 1/4 teaspoon chili powder
  • 1/4 teaspoon ground cumin

    Finishing herbs:
  • 1/2 tablespoon fresh parsley
  • 1/2 tablespoon fresh rosemary

    For light aioli dip:
  • 2 tablespoon light mayo
  • 2 tablespoon fat free greek yogurt
  • 1 garlic clove, crushed


Directions:
  1. For the aioli, combine the mayo, yogurt and 1 crushed garlic clove in a small bowl and mix with a fork. Set aside or refrigerate until fries are ready to serve.
  2. Place an oven rack at the lowest position and heat the oven to 475 degrees.
  3. Heat the 3 cloves of garlic and 1 tablespoon oil (or 1 tablespoon rendered duck fat) in a small saucepan over medium heat for 2 minutes. Strain the garlic from the oil with a small mesh strainer. Set both garlic and oil/duck fat aside.
  4. Cut each potato lengthwise into 1/4 inch slices and then cut each slice into 1/4 inch fries (if using a mandolin slicer, attach french fry blade and set thickness to 1/4 inch). In a large bowl, cover potato slices with hot tap water and soak for 10 minutes.
  5. Meanwhile, coat a 18 by 12-inch heavy-duty rimmed baking sheet with 4 tablespoon oil and sprinkle evenly with 3/4 teaspoon salt and 1/4 teaspoon pepper and set aside. Use a heavy-duty baking sheet to prevent warping in the hot oven.
  6. Drain the potatoes and then dry them by spreading them out on a triple layer of paper towels. Use additional paper towels to pat them dry. Rinse and wipe out the now-empty bowl, return the potatoes to the bowl and toss with the seasonings and the 1 tablespoon oil or duck fat used to heat garlic earlier. Arrange the potatoes in single layer on the prepared baking sheet, cover tightly with foil and bake for 5 minutes. Remove the foil and continue to bake until the bottoms of the potatoes start to turn golden brown, 15 to 20 minutes, rotating baking sheet after 10 minutes for even browning.
  7. Scrape the pan with a spatula and tongs to loosen potatoes from the pan, then turn the fries over, keeping them in a single layer. Continue baking until the fries are golden and crisp, 5 to 15 minutes longer, rotating pan as needed if fries are browning unevenly. Transfer the fries to a second baking sheet lined with paper towels to drain. Toss with garlic, finely chopped parsley and rosemary. Season with additional salt and pepper to taste and serve with light aioli dip.

White Chocolate Raspberry Cheesecake


White Chocolate Raspberry Cheesecake

Original Recipe: http://cookingclassy.blogspot.com/2011/11/white-chocolate-raspberry-cheesecake.html

Ingredients:
  • 1 store-bought pre-made oreo crust (save the lid)

  • 1 Tbsp granulated sugar
  • 1 1/2 tsp cornstarch
  • 1/3 cup cold water
  • 1 1/2 cups fresh or frozen raspberries
  • 12 oz. cream cheese (1 1/2 pkg.), softened
  • 1/3 cup granulated sugar
  • 1 egg
  • 1 egg white
  • 1 tsp vanilla extract
  • 1/2 Tbsp lemon juice
  • 6 oz. white chocolate, chopped or 1 cup white chocolate chips
  • 1/4 cup heavy whipping cream


Directions:
  1. Preheat oven to 325 degrees. In a small saucepan, whisk together 1 Tbsp granulated sugar and cornstarch until well blended. Stir in cold water and add raspberries. Cook over medium heat whisking often, until raspberries break down and sauce thickens, about 5 minutes. Remove from heat and force sauce through a fine mesh strainer into a bowl to remove seeds, set aside.
  2. In a large mixing bowl, with an electric mixer, beat together cream cheese and granulated sugar until fluffy, about 1 minute. Mix in egg and egg white. Add vanilla and lemon juice. Set mixture aside.
  3. Melt white chocolate with cream in a double boiler until melted and smooth, or melt in a microwave safe bowl in the microwave on 50% power in 30 second intervals, stirring after each interval until melted and smooth. Add melted chocolate mixture to cream cheese mixture and blend until smooth.
  4. Pour 2/3 cup cheesecake mixture into the oreo crust and spread evenly over bottom. Drizzle or spoon with 2 Tbsp raspberry sauce. Slowly ladle remaining cheesecake mixture over the drizzled raspberry sauce, covering all the raspberry sauce (you just don't want it to show through). Swirl cheesecake with a toothpick or knife (your just swirling that inside layer of sauce for now, be careful not to let the sauce show through). Carefully giggle the pan to even out the top. Now, fill a clean medicine syringe with raspberry sauce and begin to pipe small circles in a swirl pattern over cheesecake. Take a toothpick or sharp pointy knife and beginning with the center circle, run the toothpick through the center of each heart (don't lift the toothpick out until you finish the last circle).
  5. Bake cheesecake for 40 minutes, then turn oven off and leave cheesecake in the oven for 5 more minutes. Remove from oven and allow to cool. Cover with saved lid and refrigerate until fully set about 6 hours. Top slices with remaining raspberry sauce and optional sweetened whipped cream (for extra indulgence =).

Thursday, November 22, 2012

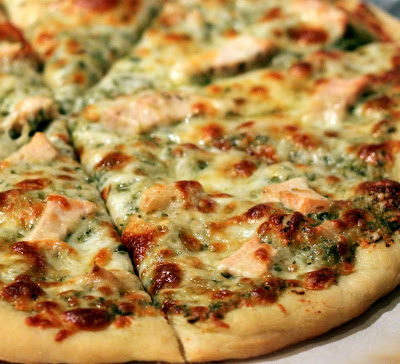
Perfect Pizza Crust and Roasted Garlic Chicken Pesto Pizza


Perfect Pizza Crust and Roasted Garlic Chicken Pesto Pizza

Original Recipe: http://sugarcooking.blogspot.com/2010/02/perfect-pizza-crust-and-roasted-garlic.html

The Perfect Pizza Curst

Ingredients:
  •     1/2 cup warm water (about 110 degrees)
  •     1 envelope (2 1/4 tsp.) instant yeast
  •     1 1/4 cups water, at room temp
  •     2 tbsp extra virgin olive oil
  •     4 cups (22 oz.) bread flour, plug more for dusting
  •     1 1/2 tsp salt
  •     Cornmeal
  •     olive oil or non-stick cooking spray for greasing bowl

Directions:
  1. Measure the warm water into a 2-cup liquid measuring cup. Sprinkle in the yeast and let stand until the yeast dissolves and swells, about 5 minutes. Add the room temperature water and oil and stir to combine.
  2. Place the flour and salt in the bowl of a stand mixer fitted with the paddle attachment. Briefly combine the dry ingredients at low speed. Slowly add the liquid ingredients and continue to mix at low speed until a cohesive mass forms. Stop the mixer and replace the paddle with the dough hook. Knead until the dough is smooth and elastic, about 5 minutes. Form the dough into a ball, put it in a deep oiled bowl, and cover with plastic wrap. Let rise until doubled in size, about 1 ½ to 2 hours. Press the dough to deflate it.
  3. To bake, place a pizza stone in the lower third of the oven. Heat the oven to 500° for at least 30 minutes. Turn the dough out onto a lightly floured work surface. Divide the dough into two equal pieces. Form both pieces of dough into smooth, round balls and cover with a damp cloth. Let the dough relax for at least 10 minutes but no more than 30 minutes.
  4. Working with one piece of dough and keeping the other covered, shape the dough and transfer to a pizza peel or round of parchment dusted with semolina or cornmeal. Top as desired. Slide the dough onto the pizza stone. Bake until the crust edges brown and cheese is golden brown in spots, about 8 to 12 minutes. Repeat with remaining ball of dough or freeze for later use.


Roasted Garlic Chicken Pesto Pizza

Ingredients:
  •     1 perfect pizza crust (recipe above)
  •     1/2 cup prepared pesto (store bough or homemade)
  •     1 bulb of garlic
  •     1 boneless, skinless chicken breast, cooked
  •     Mozzarella cheese
  •     Parmesan cheese

Directions:
  1. To roast the garlic: Peel away the outer layers of the garlic bulb skin, leaving the skins of the individual cloves intact. Using a knife, cut off 1/4 to a 1/2 inch of the top of cloves, exposing the individual cloves of garlic. Place the garlic heads in a baking pan; muffin pans work well for this purpose. Drizzle a couple teaspoons of olive oil over each head, using your fingers to make sure the garlic head is well coated. Cover with aluminum foil. Bake at 400°F for 30-35 minutes, or until the cloves feel soft when pressed. Remove garlic gloves and smash with a fork.
  2. Spread roasted garlic over pizza dough. Do this to taste. I used almost the whole (small) bulb, but I LOVE roasted garlic.
  3. Spread the pesto on the pizza.
  4. Add the sliced, cooked chicken.
  5. Sprinkle with mozzarella.
  6. Top with fresh grated parmesan.
  7. Bake on preheated pizza stone for 8 - 12 minutes.

Chicken Florentine Puffs


Chicken Florentine Puffs

Original Recipe: http://www.onelovelylife.com/?p=3777

Ingredients:
  •     2 sheets puff pastry, thawed and rolled out
  •     2 cups cooked chicken, cubed or shredded
  •     1 (10oz) pkg. frozen chopped spinach, thawed and liquid squeezed out
  •     1 roasted red pepper, diced
  •     4oz cream cheese, softened
  •     1c gruyere, grated
  •     2-3 Tbsp fresh basil (or 2 tsp dried)
  •     ¼ tsp garlic powder
  •     ¼ tsp salt
  •     ¼ tsp pepper
  •     1 egg
  •     1 Tbsp water
  •     parmesan cheese (optional, for garnish)


Directions:
  1. In a large bowl, combine chicken, spinach, red pepepr, cream cheese, gruyere, basil, garlic powder, salt, and pepper. Toss until well combined and cream cheese is completely mixed in.
  2. Make an egg wash by beating egg with water.
  3. Roll out puff pastry. Slice each sheet into 4 pieces (for 8 squares total). Divide filling among the 8 squares. For each puff, place filling in the center. Brush the edge of one half with egg wash and fold in half diagonally to form a triangle. Press down the edges with a fork to seal. Brush the top of the puff with egg wash and sprinkle with a bit of fresh parmesan, if using. Make 2-3 small slits in the top to allow steam to escape during baking.
  4. Place puffs on two baking sheets lined with parchment or sprayed with nonstick spray (I recommend using parchment).
  5. Bake at 400 degrees for 15-18 minutes, or until golden.
  6. and place in the center. Brush the edge of one half with egg wash. Fold each square in half diagonally to form a triangle. Press down edges with a fork to seal.

Notes
*To re-heat frozen puffs: place on a baking sheet lined with parchment and bake at 400 degrees 15-18 minutes or till heated through.

Lady Baltimore Cake


  • 3/4 cup butter, at room temperature
  • 2 cups sugar
  • grated zest of one lemon
  • 3 cups cake flour
  • 3 teaspoons baking powder
  • 1/2 teaspoon salt
  • 1/2 cup milk
  • 1/2 cup water
  • 1 1/2 teaspoons vanilla
  • 6 egg whites
  1. Preheat oven to 350 degrees and line 3 9-inch cake pans with parchment paper and grease generously.
  2. Cream butter, sugar and lemon zest together until light and fluffy, about 2 minutes. Sift flour, baking powder and salt together and set aside.
  3. Combine milk, water and vanilla. Add small amounts of flour mixture to creamed butter mixture, alternately with milk mixture, beating until smooth after each addition.
  4. Beat egg whites until stiff and gently fold into batter. Pour into prepared pans and bake for 20-25 minutes, or until a toothpick inserted into the center comes out clean. The cakes shouldn’t get very brown on top. Allow to cool for 10 minutes in the pans, then transfer cakes to wire wracks to cool completely.

For the Orange Marmalade Filling:
  • 3/4 (18-ounce) jar orange marmalade
  • 1 tablespoon fresh orange juice
  • 1 tablespoon fresh lemon juice
  • 1 teaspoon Grand Marnier (or any orange liqueur), optional
Heat the marmalade, orange juice and lemon juice in a small saucepan over medium heat just before it reaches boiling point. Remove from heat and stir in the Grand Marnier. Strain out the peels and allow to cool to room temperature.

For the Frosting:
  • 3 cups sugar
  • 1 cup water
  • 1/4 teaspoon cream of tartar
  • 3 egg whites
  • 1 teaspoon vanilla
  • sweetened, flaked coconut, for garnish
  1. Using a mixer, beat egg whites until stiff.
  2. Boil sugar, water and cream of tartar in a small saucepan over medium-high heat until it reaches 238 degrees on a candy thermometer, or until a small amount of syrup will form a soft ball when dropped into very cold water (this is what’s known as “soft ball stage”).
  3. With the mixer running, slowly pour the hot syrup over the egg whites and continue to beat until the mixture is of spreading consistency (this could take up to 10 minutes; don’t be alarmed if your mixture is runny, just keep beating and eventually it will thicken up.). Add vanilla.

To Assemble:
Spread half of the orange marmalade filling in the center of the bottom cake layer, leaving an inch border around the outside (when you add the frosting, the marmalade will spread). Gently spread some of the frosting over the marmalade and place second cake layer on top. Repeat with the other half of the marmalade filling and more frosting, then place the third cake layer on top. Frost the whole cake with the frosting (be generous, the recipe makes a TON of frosting!) and sprinkle generously with coconut. Refrigerate until 30 minutes to one hour before serving.

Apple Crisp


This apple crisp is a favorite for casual family dinners as well as the holidays because it is not only dairy-free and egg-free, but it's so easy to prepare. For quicker weeknight preparation, I often leave the skins on the apples, but this recipe truly benefits from peeling them first.
Makes one 9" x 13" crisp

Prep Time: 10 minutes

Cook Time: 45 minutes

Total Time: 55 minutes

Ingredients:

  • For the Filling:
  • ----------------------------
  • 10 cups peeled, cored apple pieces
  • ¾ cup white granulated sugar
  • 1 T. corn starch
  • 1 t. ground cinnamon
  • ¼ t. nutmeg
  • 3 T. water
  • 1 T. lemon juice
  • --------------------------------
  • For the Topping:
  • -------------------------------
  • 2 cups 1-minute oats (also known as quick oats)
  • 1 ¾ cup white all-purpose flour
  • 1 ½ cup packed brown sugar
  • ½ cup white granulated sugar
  • ½ cup finely chopped pecans
  • ½ t. baking powder
  • ½ t. baking soda
  • ¾ cup dairy-free soy margarine, melted

Preparation:

1. Preheat the oven to 350 F. Lightly oil or grease a 9” x 13” baking dish, or, alternatively, smaller baking dishes for individual crisps. Set aside.
2. Make the filling. In a medium-large mixing bowl, toss the apple slices with the sugar, corn starch, cinnamon, nutmeg, water and lemon juice until evenly coated. Pour into the prepared baking dish.
3. Make the topping. In a medium mixing bowl, sift together the oats, flour, sugars, chopped pecans, baking powder and baking soda until well combined. Add the melted soy margarine, mixing until the mixture is consistent. Using your hands, crumble the mixture over the apple mixture. Bake for 45 minutes to 1 hour, or until golden brown. Serve warm or cold, with dairy-free vanilla ice cream if desired.

Mini Pumpkin Muffins

 
1 cup whole-wheat or all-purpose flour
1 teaspoon pumpkin pie spice
1/2 teaspoon baking soda
1/2 teaspoon baking powder
1/4 teaspoon salt
1 cup packed light brown sugar
1/4 cup vegetable oil
1 (15-ounce) can LIBBY'S® 100% Pure Pumpkin
2 large eggs, slightly beaten
1 cup lowfat granola cereal, crumbled
  1. Preheat oven to 350°F (175°C). Paper-line or grease mini-muffin pans.
  2. Combine flour, pumpkin pie spice, baking soda, baking powder and salt in small bowl. Beat sugar and oil in medium mixer bowl until blended. Add pumpkin and eggs; beat well. Gradually stir in flour mixture. Spoon batter into prepared muffin cups, filling 2/3 full. Sprinkle each with about a 1/2 teaspoon of crumbled granola. Press granola lightly into batter.
  3. Bake for 15 to 20 minutes or until wooden pick inserted into centers comes out clean. Cool in pans for 10 minutes; remove to wire racks to cool completely. Store muffins in covered containers or resealable plastic bags.
Makes 60 mini muffins or 20 (3 mini-muffin) servings.
Nutritional Information Per Serving (3 mini-muffins): Calories: 100 Calories from Fat: 30 Total Fat: 3.5 g Saturated Fat: 0.5 g Cholesterol: 20 mg Sodium: 85 mg Carbohydrates: 17 g Dietary Fiber: 2 g Sugars: 12 g Protein: 2 g

Tuesday, November 20, 2012

Soft Pretzel Bites


  • 1 1/2 cups warm water (about 110 F)
  • 2 tablespoons light brown sugar
  • 1 package (2 1/4 teaspoons) active dry yeast (I used instant)
  • 3 ounces (6 tablespoons) unsalted butter, melted and cooled just slightly
  • 2 1/2 teaspoons kosher salt
  • 4 1/2 to 5 cups all-purpose flour
  • 3 quarts water
  • 3/4 cup baking soda
  • 1 whole egg, beaten with 1 tablespoon cold water
  • coarse sea salt


Directions:
  1. On low speed, mix the water, sugar, yeast, and butter in the bowl of a stand mixer fitted with the dough hook until combined. Let sit for 5 minutes.
  2. Add the salt and 4 1/2 cups of the flour and mix on low speed until combined.  Increase the speed to medium (I don't put my mixer above 2 when kneading dough so I just kept it there) and continue kneading until the dough is smooth and begins to pull away from the side of the bowl, about 3 to 4 minutes. If the dough appears too wet, add additional flour 1 tablespoon at a time, until the dough clears the sides of the bowl.  Remove the dough from the bowl, place on a lightly floured surface and knead into a ball with your hands.
  3. Spray a bowl with cooking spray (or oil with with vegetable oil), add the dough and turn to coat.  Cover the bowl with plastic wrap and place in a warm spot until the dough doubles in size, about 1 hour.
  4. Preheat the oven to 425 F.  Spray two baking sheets liberally with cooking spray.
  5. Bring the water to a boil in a small roasting pan over high heat and add the baking soda.
  6. Remove the dough from the bowl and place on a flat surface. Divide the dough into 8 equal pieces, about 4 1/4 to 4 1/2 ounces each.  Roll each piece into a long rope measuring about 22 inches.  Cut the dough into one inch pieces to make pretzel bites.  Boil the pretzel bites in the water solution in batches of about 10-15 for 30 seconds.  Remove with a large slotted spoon and place the pretzel bites on the prepared baking sheets, making sure they aren't touching.  Brush the tops with the egg wash and season liberally with the salt.  Place into the oven and bake for 15 to 18 minutes, or until golden brown.
  7. Remove to a cooling rack and let rest 5 minutes before eating.

Long Boy "Burgers"


Long Boy "Burgers"

Original Recipe: http://sunshineandbones.blogspot.com/2010/09/long-boy-burgers.html

Ingredients:
  • 2-4 (6-inch) sub rolls, split in half lengthwise
  • 1 1/4 cup cornflakes, crushed
  • 1/2 small onion, minced
  • 1/2 cup whole or lowfat milk
  • 6 tablespoons ketchup, separated
  • 1 tablespoon Worcestershire sauce
  • 1 teaspoon minced fresh thyme
  • 1/2 teaspoon garlic powder
  • 1 large egg, lightly beaten
  • Salt and pepper
  • 1 1/2 pounds 90% lean ground beef
  • 2 cups shredded cheddar cheese


Directions:
Adjust the oven rack to upper-middle position and heat oven to 450 degrees.
  1. Bake rolls, cut side up, on wire rack inside rimmed baking sheet until golden and crisp, about 5 minutes.
  2. Combine cornflakes, onion, milk, 4 tablespoons ketchup, Worcestershire sauce, thyme, garlic powder, egg, 1/2 teaspoon salt, and 1 teaspoon pepper in large bowl. Add meat and knead gently until well combined.
  3. Top toasted rolls evenly with meat mixture, spreading meat to edges of rolls. Brush top of meat mixture evenly with remaining ketchup and bake until meat registers 160 degrees, 20-25 minutes. Top burgers with cheese and continue to bake until cheese melts, 3-4 minutes. Let rest 5 minutes. Serve.

Oreo Ice Cream Cake


Oreo Ice Cream Cake

Original Recipe: http://engineerbaker.blogspot.com/2011/06/oreo-ice-cream-cake.html

Ingredients:
For the cake:
  • 1 1/3 cups flour
  • 1 2/3 cups sugar
  • ½ cup dutch-process cocoa powder
  • 1 1/3 tsp baking soda
  • 2/3 tsp salt
  • 2/3 cup vegetable oil
  • 2/3 cup sour cream
  • 1 cup water
  • 4 tsp distilled white vinegar
  • ½ tsp vanilla
  • 2 eggs
  1. Preheat oven to 350*F. Butter the bottoms and sides of two 8- or 9-inch cake pans (layers will just be taller if you use an 8-inch pan). Line the bottoms of the pans with parchment paper, then butter the parchment.
  2. Sift the flour, sugar, cocoa powder, baking soda, and salt into a large bowl. Whisk to combine them well. Add the oil and sour cream and whisk to blend (this will be very thick). Gradually beat in the water. Blend in the vinegar and vanilla. Whisk in the eggs and beat until well blended. Scrape down the sides of the bowl and be sure the batter is well mixed. Divide among the two prepared cake pans.
  3. Bake for 25-35 minutes (less for the 9-inch pans, more for the 8-inch), or until a cake tester inserted in the center comes out almost clean. Let cool in the pans for about 20 minutes, invert onto wire racks, carefully peel off the paper liners, and let cool completely.

For the ice cream:
  • 1 cup whole milk
  • ¾ cup sugar
  • ½ cup malt powder
  • 2 cups heavy cream
  • pinch of salt
  • 1 vanilla bean, split in half lengthwise
  • 6 large egg yolks
  • ¾ tsp vanilla extract
  • 3 Tbsp vodka
  • 20 Oreos, coarsely crushed
  1. Warm the milk, sugar, malt powder, 1 cup of heavy cream , and salt in a medium saucepan. Scrape the seeds from the vanilla bean into the warm milk and add the bean as well. Cover, remove from the heat, and let steep at room temperature for 30 minutes.
  2. Pour the remaining 1 cup cream into a large bowl. In a separate medium bowl, whisk together the egg yolks. Slowly pour the warm mixture into the egg yolks, whisking constantly, then scrape the warmed egg yolks back into the saucepan.
  3. Stir the mixture constantly over medium heat with a heatproof spatula, scraping the bottom as you stir, until the mixture thickens and coats the spatula. Pour the custard into the large bowl of heavy cream. Add the vanilla extract and mix well.
  4. Chill the mixture thoroughly in the refrigerator. When ready to churn, remove the vanilla bean, rinsing and reserving it for another use. Add the vodka then freeze the mixture in your ice cream maker according to the manufacturer’s instructions. Once the ice cream is done churning, mix in the crushed Oreos with a spatula before transferring to a container. Chill in the freezer for at least 3 hours before using.

For the frosting:
  • 4 oz cream cheese, at room temperature
  • 1 lb powdered sugar
  • 2-4 Tbsp milk
  • pinch of salt
  • 5 Oreos, pulverized in a food processor
  1. Using a hand mixer, beat the cream cheese with the salt until smooth. Alternately add powdered sugar and milk until you reach your desired consistency. Mix in the Oreo crumbs. Use immediately, or refrigerate and let come to room temperature before using.

To assemble:
Make sure that your cake is cooled completely, your ice cream is solid, and you have a level place in the freezer to stash the cake as you assemble. Place one cake layer on a nice plate (you can chill the cake layers in the freezer as well, for extra insurance). Use a large cookie scoop to scoop 1-2 cups of ice cream on top of the cake layer. Quickly spread the ice cream evenly around the cake. Freeze for at least one hour, preferably two. Once the ice cream has hardened back up again, take the cake out of the freezer and place the second cake layer on top. Frost with cream cheese frosting. Freeze again, but now for at least 2-3 hours. If you want to cover the cake with foil or plastic wrap, do so at this point. It’s sliceable and not too hard to eat directly out of the freezer given the vodka in the ice cream and that the cake is oil-based rather than butter-based. That will also keep the cake from drying out too quickly, even in the freezer.

Four Cheese Spinach Dip


Four Cheese Spinach Dip

Original Recipe: http://iadorefood.com/recipes/four-cheese-spinach-dip-kelseys-style/

Ingredients:
  •     8 Ounce of cream cheese (room temp)
  •     1 Teaspoon of garlic powder
  •     1/3 Cup freshly grated Parmesan cheese
  •     2 Tablespoon freshly grated Romano cheese
  •     2 Tablespoon very finely chopped red bell pepper
  •     2 green onion (scallion) white and green finely chopped
  •     1 Cup of wilted fresh baby spinach, squeezed dry and chopped (or frozen and thawed)
  •     1/2 Cup grated medium Cheddar cheese
  •     a pinch of cayenne and paprika


Directions:
  1. Preheat oven to 400 degrees F.
  2. Mix cream cheese, garlic powder, parmesan, romano, cayenne and paprika with hand or stand mixer on medium until softened and well mixed.
  3. Add the red peppers and the scallions and mix on med-low until just incorporated.
  4. Add spinach and mix on low until just incorporated.
  5. Transfer mixture to a small ovenproof dish and top with cheddar. Bake for 15 - 18 minutes or until bubbling around the edges.
  6. Remove from oven and allow to set for 5 - 7 minutes before serving. Serve with fried or baked pita wedges and tortilla chips (nachos).

Cheesy Garlic Bread


Cheesy Garlic Bread

Original Recipe: http://www.justataste.com/2011/05/cheesy-garlic-bread/

Ingredients:
  • ½ cup (1 stick) butter, softened
  • 1 cup shredded Asiago cheese
  • 1 cup shredded Monterey Jack cheese
  • 1 cup mayonnaise
  • 1 bunch scallions, chopped, green and white parts divided
  • 2 cloves garlic, minced
  • 1 loaf French bread


Directions:
  1. Preheat the oven to 350ĀŗF.
  2. In a bowl, combine the softened butter, Asiago cheese, Monterey Jack cheese, mayonnaise, white parts of the chopped scallions and minced garlic. Stir until thoroughly combined.
  3. Split the loaf of bread in half lengthwise and spread both sides with the cheese mixture.
  4. Bake the bread for 7 minutes then place it under the broiler just until golden brown, about 3 minutes.
  5. Top the bread with the green parts of the chopped scallions, cut it into slices and serve.

Sugar Cookie Squares


Sugar Cookie Squares

Original Recipe: http://cookingclassy.blogspot.com/2011/11/sugar-cookie-squares.html

Ingredients:
  • 1/2 cup butter, softened
  • 1 cup granulated sugar
  • 1 egg
  • 1 egg white
  • 1 1/2 Tbsp sour cream (I just do 1 heaping Tbsp)
  • 1 tsp vanilla extract
  • 2 1/2 cups all-purpose flour
  • 1/2 tsp baking powder
  • 1/2 tsp salt
  • 1 recipe vanilla frosting, recipe follows
Directions:
  1. Preheat oven to 375 degrees. Butter a 13" x 9" baking dish, set aside. In a mixing bowl combine flour, baking powder and salt, set aside. In the bowl of an electric mixer, whip together butter and sugar until pale and fluffy about 3-4 minutes. Stir in egg and egg white. Add sour cream and vanilla and mix until blended. Slowly add dry mixture and stir until well combine. With buttered hands, gently press (so gently almost patting) mixture into buttered baking dish. Bake 17 - 20 minutes until toothpick inserted into the center comes out clean and edges are lightly golden. Cool completely, then frost and cut into squares.

Vanilla Frosting

Ingredients:
  • 1/4 cup unsalted butter, softened
  • 2 cups powdered sugar
  • 2-3 Tbsp half and half
  • 1/2 tsp vanilla
  • Pinch of salt
  • Several drop food coloring (optional)
  1. In a mixing bowl, with an electric mixer, whip together butter and powdered sugar and half and half until fluffy. Stir in vanilla and salt. Add in food optional food coloring and mix until well blended.

Monday, November 19, 2012

Baked Southwestern Egg Rolls


Baked Southwestern Egg Rolls

Original Recipe: http://www.annies-eats.com/2010/03/05/baked-southwestern-egg-rolls/

Ingredients:
  •     2 cups frozen corn, thawed
  •     1 (15 oz.) can black beans, rinsed and drained
  •     1 (10 oz.) package frozen chopped spinach, thawed and squeezed dry
  •     2 cups shredded Mexican cheese blend
  •     1 (4 oz.) can diced green chiles, drained
  •     4 green onions, chopped
  •     1 tsp. ground cumin
  •     ½ tsp. chili powder
  •     1 tsp. salt
  •     ½ tsp. pepper
  •     ¼ tsp. cayenne pepper
  •     1 package egg roll wrappers (about 24 total)


Directions:
  1. In a large bowl, combine everything but the egg roll wrappers. Mix well to blend. Lay an egg roll wrapper out on a work surface so that one of the corners is pointing toward you and place ¼ cup of the filling in the center. Fold the tip closest to you up over the filling, roll a bit, then take the points pointing outward and fold them in toward the center. Continue rolling into an egg roll shape until a small part of the remaining point is still free. Dip a finger in water or beaten egg and lightly brush on the edges of the free corner. Finish rolling and press to seal closed. Repeat with the remaining wrappers and filling.
  2. Preheat the oven to 425˚ F. Lightly oil a baking sheet with cooking spray. Place the sealed egg rolls on the baking sheet seam side down and spray the tops of the egg rolls with cooking spray. Bake for about 15 minutes, or until lightly brown, turning halfway through baking. Serve warm with salsa.

Individual Seven-Layer Dips


Individual Seven-Layer Dips

Original Recipe: http://www.the-girl-who-ate-everything.com/2011/12/individual-seven-layer-dips.html

Ingredients:
  • 1 (16 ounce) can refried beans
  • 1 (1 ounce) package taco seasoning
  • 1 cup guacamole
  • 1 (8 ounce) container sour cream
  • 1 cup chunky salsa or pico de gallo
  • 1 cup shredded cheddar or Mexican blend cheese
  • 2 Roma tomatoes, diced
  • 1/2 bunch of green onions, sliced
  • 1 (2.25 ounce) can of sliced olives, drained
  • 8 (9 ounce) plastic tumblers
  • tortilla chips
Note: All measurements are approximate. Depending on whether you want thicker or thinner layers you will need more or less.


Directions:
In a small bowl mix taco seasoning with refried beans. Some people prefer to mix their taco seasoning with the sour cream layer but I wanted a bright white layer so I did it with the beans.
Here’s how the layers are assembled:
Layer 1: beans and taco seasoning
Layer 2: sour cream
Layer 3: guacamole
Layer 4: salsa or pico de gallo
Layer 5: cheese
Layer 6: tomatoes
Layer 7: green onions and olives
In each plastic glass, layer about 2 Tablespoons of the beans, followed by 2 Tablespoons of sour cream, 2 Tablespoons of guacamole, 2 Tablespoons of salsa or pico de gallo, and 2 Tablespoons of cheese. Make sure you drain your salsa or pico to get the excess liquid out before you pour it on. Then top with about 1-2 teaspoons of tomatoes, olives, and green onion (If making ahead of time, wait to add these toppings until shortly before serving).

Garnish with one tortilla chip. Store in the refrigerator until serving and serve with chips. Makes around 8 individual dips.

Pumpkin Cinnamon Roll Pancakes


Pumpkin Cinnamon Roll Pancakes

Original Recipe: http://pixelatedcrumb.com/2011/10/06/pumpkin-cinnamon-roll-pancakes/

Ingredients:
    For the cinnamon swirl:
  •     1/2 cup (1 stick) salted butter, melted
  •     3/4 cup brown sugar
  •     1 tablespoon ground cinnamon

    For the cream cheese icing:
  •     4 tablespoons (1/2 stick) salted butter
  •     2 ounces cream cheese
  •     3/4 cup powdered sugar, sifted
  •     1/2 teaspoon vanilla extract

    For the pancakes:
  •     1 1/2 cups 1% milk
  •     1 cup pure unsweetened pumpkin puree
  •     2 large eggs
  •     2 tablespoon canola or vegetable oil
  •     2 tablespoons apple cider vinegar
  •     2 cups all-purpose flour
  •     1 tablespoon baking powder
  •     1/2 teaspoon baking soda
  •     1 teaspoon allspice
  •     1 teaspoon ground cinnamon
  •     1 teaspoon ground ginger
  •     1/2 teaspoon ground cloves
  •     1/2 teaspoon ground nutmeg
  •     1/2/ teaspoon salt
  •     1 tablespoon packed light brown sugar


Directions:
Prepare the cinnamon filling:
  1.     In a small, microwave-safe bowl, heat butter for 40 to 60 seconds, just until butter is melted. Whisk in brown sugar and cinnamon and let the mixture sit on the counter to thicken while you work on the next steps.

Prepare the icing:
  1. In a medium microwave-safe bowl, heat butter and cream cheese 30 to 60 seconds, just until butter has melted and cream cheese has softened. Whisk in powdered sugar and vanilla and combine until smooth. Pour the icing in a sandwich-size ziplock bag and set aside.

Prepare the pancake batter:
  1. In a large bowl, whisk together milk, pumpkin, eggs, oil, and vinegar. In a separate bowl, whisk together flour, baking powder, baking soda, pumpkin pie spice, salt and brown sugar. Add the dry ingredients to the pumpkin mixture and stir just until all is moistened.

Check on your cinnamon filling:
  1. Whisk up the cinnamon mixture again if the butter has separated at all and pour into a sandwich-size ziplock bag. The mixture should have thickened to about the consistency of toothpaste (throw it in the refrigerator for a few minutes if you need to - the swirl won't work if it is runny). Snip off a small piece of the corner of the bag and set aside carefully so nothing leaks out.

Cook the pancakes:
  1. Preheat a large skillet or griddle to medium. Use a ladle or an ice cream scoop to add the batter to the pan. Use the bottom of the scoop or ladle to spread out the batter into a nice, even circle. Reduce the heat to medium-low. Pick up your cinnamon filling baggie and squeeze the filling into the corner. Starting at the center of the pancake squeeze the cinnamon filling on top of the pancake batter in a swirl. Cook the pancakes 3 to 4 minutes, or until bubbles begin popping on top of the pancake and it is golden brown on the bottom.
  2. Slide a thin spatula underneath the pancake and gently but quickly flip it over. Cook an additional 2 to 3 minutes, until the other side is golden as well. When you flip the pancake onto a plate, you will see that the cinnamon filling has created a crater-swirl of cinnamon. Wipe out the pan with a paper towel, and repeat with the remaining pancake batter and cinnamon filling.
  3. Just before serving, cut the tip off of the bag with the cream cheese icing and drizzle it on top of the pancakes. Serve pancakes hot.

Spanakopita Bites


Spanakopita Bites

Original Recipe: http://joelens.blogspot.com/2010/09/spanakopita-bites.html

Ingredients:
  • 1 Tablespoon vegetable oil
  • 1 small onion, chopped
  • 3 green onions, chopped
  • 10 ounces frozen chopped spinach. thawed and squeezed dry
  • 4 to 6 ounces domestic feta cheese, crumbled
  • 1 cup cottage cheese
  • 1 egg
  • Salt and pepper to taste
  • 1 pound phyllo, thawed
  • 8 tablespoons butter (1 stick), melted
  • 2 tablespoons vegetable oil


Directions:
  1. Preheat oven to 375 degrees
  2. Heat 1 tablespoon of oil in medium skillet over medium heat. Add white and green chopped onions; cook until softened, 3 to 4 minutes.
  3. Meanwhile, mix spinach, feta, cottage cheese and egg in medium bowl. Add cooked onions and season with salt, and pepper. Cover and refrigerate until ready to use.
  4. Combine the remaining butter and oil and set aside until ready to use.
  5. Remove the phyllo dough from the package and stack up. Carefully cut the phyllo dough into 2 inch by 2 inch squares; set aside.
  6. Prepare your mini muffin pan by brushing butter in each well. Place 1-2 squares of phyllo dough into each well, pushing down to create a cup or crust. Brush the top phyllo filled wells with more melted butter and repeat by placing 1-2 squares of phyllo dough into each well and pushing down to create a cup or crust again. Repeat with another layer of 1-2 squares of phyllo dough and brush with more melted butter.
  7. Place a heaping teaspoon into each well, filling the phyllo cup. Bake in the preheated oven for 15-20 minutes or until golden brown.

Corn and Chicken Chowder


Corn and Chicken Chowder

Original Recipe: http://bunsinmyoven.com/2011/02/18/corn-and-chicken-chowder/

Ingredients:
  • 6 ears of fresh corn, husked and silks removed (or 1-30 ounce can corn and 1-15 ounce can cream corn)
  • 6 slices bacon, chopped
  • 8 scallions
  • 3 medium potatoes (I use Idaho potatoes)
  • 2 tablespoons all-purpose flour
  • 3 cups whole milk
  • 2 cups chicken stock
  • 2 teaspoons Old Bay seasoning
  • 1 teaspoon dried parsley flakes
  • 1/2 teaspoon dried thyme
  • 1/4 teaspoon cayenne pepper
  • 1 small can (4 ounces, I believe) chopped green chiles
  • 2 cups roasted chicken, shredded (a Rotisserie chicken from the deli works great for this!)
  • Salt and pepper, to taste
  • handful of grated cheddar, for garnish


Directions:
  1. In a large stock pot, fry the bacon pieces until crisp. Remove from the pan, leaving the drippings, and set aside.
  2. Peel and chop the potatoes into bite sized chunks. Slice the scallions very thin and separate the greens from the whites.
  3. Place the potatoes and white scallion pieces into the stock pot and cook over medium heat until the scallions have softened, 2 or 3 minutes.
  4. Sprinkle in the flour and cook, stirring constantly, for about 1 minute.
  5. Pour in the milk, chicken stock, Old Bay, thyme, parsley, cayenne, salt, and pepper, stirring well. Bring to a boil over medium heat, stirring occasionally.
  6. Reduce heat to low and simmer for 12-15 minutes or until the potatoes are tender. Add corn (If using fresh corn, cut from the cob with a sharp knife. Use the back of your knife to release the pulp from the cob.), chicken, and green chiles. Cook over low heat until heated through, about 5 minutes. Garnish with scallion greens, bacon, and cheddar cheese.

Apple Pie Bars


Apple Pie Bars

Original Recipe: http://www.mybakingaddiction.com/apple-pie-bars-recipe/

Ingredients:
For the Crust:
  • 3 sticks unsalted butter, softened
  • 3/4 cup sugar
  • 3 cups all-purpose flour
  • 1/2 teaspoon kosher salt

For the Filling:
  • 6 tablespoons unsalted butter
  • 1/2 cup light brown sugar
  • 12 Granny Smith apples (about 6 pounds)—peeled, cored and thinly sliced
  • 1 tablespoon cinnamon
  • 1/4 teaspoon freshly grated nutmeg
  • 1/2 cup water, if necessary

For the Topping:
  • 3 cups quick-cooking oats
  • 2 cups all-purpose flour
  • 1 1/2 cups light brown sugar
  • 1 1/4 teaspoons cinnamon
  • 1/2 teaspoon baking soda
  • 1/2 teaspoon kosher salt
  • 3 sticks (12 ounces) unsalted butter, cut into 1/2-inch cubes and chilled
  • 3/4 cup chopped pecans


Directions:
Make the Crust:
  1. Preheat the oven to 375°. Line a 15-by-17-inch rimmed baking sheet with parchment paper. In a standing mixer fitted with the paddle attachment, beat the butter with the sugar at medium speed until light and fluffy, about 2 minutes. At low speed, beat in the flour and salt until a soft dough forms.
  2. Press the dough over the bottom of the prepared pan creating an even layer. Bake in the center of the oven for about 20 minutes, until the crust is golden and set. Let cool on a rack.

Make the Filling:
  1. In an extra large skillet, melt 6 tablespoons of the butter with 1/2 cup of the light brown sugar. Add the apples to the skillet and cook over high heat, stirring occasionally, until softened, about 10 minutes. Stir the cinnamon and nutmeg.
  2. Cook until the apples are caramelized and very tender and the liquid is evaporated, about 10 minutes longer; scrape up any bits stuck to the bottom of the skillet and if necessary, add up to 1/2 cup of water to prevent scorching. Let cool. (I did not need to add any water to my skillet.)

Make the Topping:
  1. In a large bowl, mix the oats with the flour, light brown sugar, cinnamon, baking soda and salt. Using a pastry blender to cut in the butter until the mixture resembles coarse meal. Stir in the pecans and press the mixture into clumps.

Assemble and Bake:
  1. Spread the apple filling over the crust. Scatter the crumbs on top, pressing them lightly into an even layer. Bake in the center of the oven for 1 hour, until the topping is golden; rotate the pan halfway through baking. Let cool completely on a rack before cutting into 2-inch bars.

Sunday, November 18, 2012

Quick and Easy Taco Dip


Quick and Easy Taco Dip

Original Recipe: http://www.mykitchenaddiction.com/2009/06/quick-and-easy-taco-dip/

Ingredients:
  • 1 pound lean ground beef (90/10)
  • 1/2 red onion, diced
  • 2 cloves garlic, minced
  • 8 ounces light cream cheese, softened
  • 1/2 cup light ranch dressing
  • 1 tablespoon chili powder
  • 1 teaspoon ground cumin
  • 2 ounces cheddar cheese, shredded
  • 2 ounces pepper jack cheese, shredded
  • Tortilla chips


Directions:
  1. Preheat the oven to 400°F.  Spray a 9-inch pie plate with cooking spray and set aside.
  2. In a skillet, brown the ground beef over medium heat.  Drain, and return the beef to the skillet.  Add the onion and garlic, and cook for 4-5 minutes.  Remove from the heat.
  3. In a bowl, combine the cream cheese, ranch dressing, chili powder, and ground cumin.  Add the beef mixture and half of the shredded cheese.  Stir to combine.  Transfer the mixture to the prepared pie plate, and sprinkle with the remaining shredded cheese.
  4. Bake for 15-20 minutes until the cheese is golden and bubbly.  Serve with tortilla chips.

Chicago-Style Deep Dish Pizza


Chicago-Style Deep Dish Pizza

Original Recipe: http://penniesonaplatter.com/2011/01/24/chicago-style-deep-dish-pizza/

Ingredients:
Yield: One 9-inch deep dish pizza (3-4 servings)

For the dough:
  • 1 1/2 cups + 2 tablespoons all-purpose flour
  • 1/4 cup yellow cornmeal
  • 3/4 teaspoon salt
  • 1 teaspoon sugar
  • 1 1/8 teaspoon instant yeast
  • 1/2 cup + 2 tablespoons water, at room temperature
  • 1 1/2 tablespoon unsalted butter, melted
  • 1 teaspoon olive oil
  • 2 tablespoons unsalted butter, softened

For the sauce:
  • 1 tablespoon unsalted butter
  • 2 tablespoons grated onion
  • Pinch of dried oregano
  • 1/4 teaspoon salt
  • 1 clove garlic, minced or pressed
  • 1 (14.5 oz) can petite-diced tomatoes
  • Pinch of sugar
  • 2 tablespoons chopped basil leaves
  • 1 1/2 teaspoon olive oil
  • Ground black pepper, to taste
  • Salt, to taste

For assembling and topping:
  • 2 tablespoons olive oil
  • 8 ounces Mozzarella, shredded (about 2 cups)
  • 1/4 ounce Parmesan cheese, grated (about 2 tablespoons)


Directions:
To make the dough:
  1. Whisk together the flour, cornmeal, salt, sugar and yeast in the bowl of a stand mixer, until well blended.  Attach the dough hook and mix in the water and melted butter on low speed for 1 to 2 minutes.  Scrape the sides and bottom of the bowl as needed.  Increase the speed to medium-low and knead until the dough is glossy and smooth, about 3 to 4 minutes.
  2. Coat a medium bowl with 1 teaspoon of the olive oil.  Transfer the dough to the bowl, turning once to coat with oil.  Cover tightly with plastic wrap and let rise at room temperature until nearly doubled, about 45 to 60 minutes.
  3. Once dough is risen, turn it out onto a dry work surface and roll into an 8- x 6-inch rectangle.  To laminate the dough, spread the softened butter over the surface, leaving a 1/2-inch border around the edge.  Starting at the short end, roll the dough into a tight cylinder.  With the seam side down, flatten the cylinder into a 9- x 2-inch rectangle, then fold into thirds like a business letter.  Pinch the seams to form a ball, and return to the oiled bowl.  Cover tightly again with plastic wrap and let rise in the refrigerator for 40 to 50 minutes.  (Mine did not double in size, but it rose to about size and a half.)

Meanwhile, prepare the sauce:
  1. In a medium saucepan, melt the butter over medium heat.  Stir in the onion, oregano and salt.  Saute until the liquid has nearly evaporated and the onion is golden brown, stirring often, about 3 to 5 minutes.  Add the garlic and cook just until fragrant, about 30 seconds.  Stir in the tomatoes and sugar, then increase the heat to medium-high.  Bring the mixture just to a boil, then lower the heat to medium-low and continue to simmer until reduced to about 1 1/4 cups, about 15 minutes.  Remove from heat and stir in the basil and oil.  Season with salt and pepper to taste.

Assemble and top the pizza:
  1. Preheat oven to 425˚F.  Coat a 9-inch round cake pan with olive oil.  Move the dough to a dry work surface and roll out into a 13-inch disk about 1/4-inch thick.  Carefully transfer the dough to the pan and lightly press to line the bottom of the pan and 1 inch up the sides.  If the dough resists stretching, wait 5 minutes before trying again.
  2. Sprinkle the shredded Mozzarella over the surface of the dough, then layer the sauce over the cheese.  Top with Parmesan and bake for 20 to 25 minutes, until crust is golden brown.  Let rest for 10 minutes before slicing.

Recipe Note: This recipe is for one 9-inch deep dish pizza, whereas the original is for two.  I altered some of the steps as I found I didn’t need as much time for kneading the dough, cooking the sauce, or baking the pizza.  These changes are reflected in my version above.  If you double this recipe, your times may increase significantly for cooking the sauce, and slightly for kneading and baking.

To Make Ahead: Prepare the dough up until the time of baking.  Store in fridge overnight, or freeze and thaw in fridge.  When ready to bake, place pan in oven while preheating so that it warms up slowly.  Once oven is preheated to 425˚F, bake for 20 more minutes, until crust is golden brown.

Butterfinger No-bake Cheesecake


Butterfinger No-bake Cheesecake

Original Recipe: http://www.bakersroyale.com/cheesecake/mini-butterfinger-cheesecakes/

Ingredients:
Makes 10  two inch cheesecakes or one 8 inch cheesecake.
 
Crust:
  • 9 oz mini size butterfingers (about 24 mini size Butterfingers)
  • 3 oz pretzels

Cheesecake:
  • ¼ cup water
  • 1 tablespoon powdered gelatin
  • 1 1/2 cups heavy cream
  • 8oz cream cheese, softened
  • ¼ cup creamy peanut butter
  • 1/3 cup sugar
  • Pinch of salt
  • ½ cup Buttercup and Pretzel mixture

Chocolate Pouring Glaze:
  • 2/3 cups dark chocolate
  • 2 tablespoons heavy cream
  • 4 tablespoons powdered sugar, sifted
  • 4-5 tablespoons water, warm

Peanut Butter Cream Cheese Frosting:
  • ¼ cup cream cheese, softened
  • 2 tablespoons peanut butter
  • 5 tablespoons powdered sugar
  • 2-3 tablespoons whole milk

Directions:
Crust:
  1. Combine Butterfingers and pretzels in a food processor bowl or blender and process until finely ground. Measure out ½ cup Butterfinger and Pretzel mixture and set aside.
  2. Press remaining mixture into pan and bake at 350 degrees F for about 7 minutes. Set aside to cool. (No need for butter the chocolate will melt and bind the crust together.)

Cheesecake:
  1. Pour ¼ cup of cold water into a shallow, heat-proof bowl. Sprinkle gelatin over water and set aside for five minute until gelatin blooms. Place bowl of bloomed gelatin in microwave at 50% power and heat for 10 seconds. Mixture should be hot, but not steaming. Make sure mixture is liquidified and no lumps are visible. Set aside.
  2. Place heavy cream into a stand mixer bowl fitted with a whisk attachment and beat on high until medium peaks form. Set aside.
  3. Add cream cheese, peanut butter, sugar, salt, Butterfinger and Pretzel mixture, in a bowl and beat until smooth.
  4. Add one tablespoon of gelatin into cream cheese mixture at a time and gently fold to combine. Add heavy cream mixture and fold to combine.
  5. Transfer mixture to a pastry bag and pipe into wells. Refrigerate for at least 6 hours to set or overnight for best result. For smooth and even sides, use an offset spatula and run it along the edge of the removable bottom, using that as a guide, continue all the way around the mini cake until you end up where you started.

Chocolate Pouring Glaze:
  1. Place chocolate and heavy cream in a bowl over simmering water. Let chocolate and cream sit for 2-3 minutes to melt without stirring. Then slowly stir mixture to combine. Add powdered sugar and mix to combine. Add water 1 tablespoon at a time, mixing after each addition until pouring consistency is reached. Set aside and let sauce cool to warm.

Peanut Butter Cream Cheese Frosting:
  1. Combine all ingredients and beat to combine.

TO ASSEMBLE:
  1. Pour warm glaze on top of cheesecake and pipe a dollop of peanut butter cream cheese frosting on top. Return to fridge for an hour or until 20 minutes before serving.

QUINOA BURGER


Garlic & Mozzarella Wontons

Original Recipe: http://blogs.babble.com/family-kitchen/2011/10/26/garlic-cheese-wontons

Ingredients:
  • 2 rounded cups cooked quinoa (see note below for cooking instructions)
  • 3/4 cup shredded cheddar cheese (or other variety, if you prefer)
  • 1/2 cup low-fat cottage cheese
  • 1 medium carrot, finely grated (OR 1 cup shredded zucchini, squeezed dry)
  • 3 eggs
  • 3 tablespoons all purpose flour
  • 2 green onions, including white parts
  • 1 /2 teaspoon Splenda or sugar
  • 1/4 teaspoon black pepper
  • 1/4 teaspoon ground cumin
  • 1/8 teaspoon salt
  • 1/8 teaspoon garlic powder
  • Olive oil for frying


Directions:
  1. In a large bowl combine the 2 rounded cups of cooked quinoa, cheddar cheese, cottage cheese, carrot, eggs, flour, green onions, Splenda, pepper, cumin, salt, and garlic powder.
  2. (To help them stay in patty form and not fall apart, I cook them on med-low slowly so they have longer to set-up without burning.  Makes them easier to flip, too.)  Heat a frying pan and a couple teaspoons olive oil over medium-low heat.  Mixture will be slightly sticky, so using a 1/4 cup measuring cup, drop mixture into pan and lightly flatten to 1/2 inch thick.  Fry until golden-brown, about 4 minutes on each side.   Makes approx. 10 burgers.


To cook quinoa for the above recipe:
  • 1 cup uncooked quinoa
  • 2 cups water
  • 1/2 teaspoon salt

In a medium saucepan bring the 2 cups water and 1/2 teaspoon salt to a boil over high heat.  Add quinoa and reduce heat to low.  Cover and cook for 18-20 minutes, or until all water is absorbed and the seeds are tender.  Allow to cool for a few minutes.

Garlic & Mozzarella Wontons


Garlic & Mozzarella Wontons

Original Recipe: http://blogs.babble.com/family-kitchen/2011/10/26/garlic-cheese-wontons

Ingredients:
  •     4 ounces fresh mozzarella
  •     2 teaspoons minced garlic (fresh or the sort in the jar)
  •     fresh ground pepper
  •     12 wonton wrappers
  •     1 cup of your favorite marinara sauce
 

Directions:
Place small pieces of fresh mozzarella cheese onto wonton wrappers. Sprinkle a small amount of minced garlic and a bit of cracked pepper over the cheese. Moisten the edges of each wonton wrapper with a bit of water. Press the edges together to for a triangle-shaped wonton. Gently transfer the wontons into a pan of coconut oil heated to medium heat. Cook wontons on both sides, until golden brown. Remove from heat and serve immediately with your favorite marinara sauce.

Raspberry Dessert Bites


Raspberry Dessert Bites

Original Recipe: http://www.madewithpink.com/2011/06/raspberry-lemon-cheesecake-bites.html

Ingredients:
2 Cups Fresh Raspberries, washed
Lemond Curd, homemade or store bought - it doesn't matter!

No Bake Cheesecake Filling:
  • 8oz (227g) Cream Cheese (don't use light, as it won't work the same)
  • 2 Tbsp + 2 tsp (37g) Granulated / Castor Sugar
  • 1/4 cup (60ml) Whipping Cream or Double Cream
  • 1/4 tsp Vanilla Extract  


Directions:
  1. Wash your raspberries and set aside.  In a medium bowl mix the cream cheese, sugar and vanilla using an electric mixer until nice and smooth.
  2. Whip the cream, and then fold the whipped cream into the cream cheese mixture so it's fully combined.  Fold gently though - you don't want to loose all the air in the cream!
  3. Refrigerate for about 15 minutes to firm up.
  4. Fill two piping bags fitted with small star tips with your fillings - 1 with lemon curd and the other with the cheesecake mixture (note: if you don't have any piping tips or bags you can put each filling into a plastic zip lock bag and snip the tips off of them).  One by one, take each raspberry and carefully fill each one with either the cheesecake or lemon filling making sure not to squeeze the raspberries too much or they'll go to mush!  Fill them all, and then snack away!

Mongolian Beef Recipe

Photo Credit: http://blogchef.net


Mongolian Beef Recipe

Original Recipe: http://blogchef.net/mongolian-beef-recipe/

Ingredients:
  • 1 lb flank steak
  • ¼ cup cornstarch
  • 2 teaspoons vegetable oil
  • ½ teaspoon ginger (minced)
  • 1 tablespoon garlic (minced)
  • ½ cup soy sauce
  • 1/2 cup water
  • ½ cup brown sugar
  • 2 tablespoons rice wine
  • ½ teaspoon red pepper flakes
  • 2 green onions (sliced)
  • 1 medium onion (sliced)
  • Oil (for frying)


Directions:
  1. To make the sauce- in a sauce pan heat 2 teaspoons of oil. Add garlic and ginger, stir fry 10 seconds. Add soy sauce, wine and water. Add brown sugar and dissolve into the sauce. Add red pepper flakes. Bring the sauce to a boil and boil for 2-3 minutes. Remove from heat.
  2. Slice the flank steak against the grain into ¼” thick slices. Tilt the knife blade at a 45 degree angle to the top of the steak to get wider cuts. Toss the steak slices with cornstarch and let the beef sit for 10 minutes (this is very important, do not skip).
  3. Heat up about a cup of oil in your wok to about medium heat. Add the beef slices to the wok and cook for 3 minutes (or use a deep fryer). 
  4. Remove the meat from the wok with a slotted spoon and drain on paper towels. Drain all of the oil from the wok expect about a tablespoon. Add onions to the wok and stir fry for 2 minutes. Add the steak back to the wok and pour in the sauce. Cook while stirring until the sauce began to bubble.
(Makes 2 Servings)

Template by: